I. Introduction to Upcycled Radiators: The Benefits of Repurposing
II. Creative Ideas for Transforming Radiators into Unique Shelving
III. Step-by-Step Guide to DIY Upcycled Radiator Shelving Projects
Introduction to Upcycled Radiators: The Benefits of Repurposing
Have you ever thought about giving your old radiators a second life? If you’ve got some unused radiators just sitting in your home, you might not realize the treasure trove of potential they hold! Upcycling, or repurposing old items into something new and functional, is a fantastic way to breathe new life into everyday objects while minimizing waste. Let’s dive into the world of upcycled radiators and explore why this trend is becoming a go-to choice for many creative souls.
Why Upcycle Radiators?
First and foremost, upcycling radiators is an environmentally friendly choice. With the increasing emphasis on sustainability, more and more people are looking for ways to reduce their carbon footprint. By repurposing materials that might otherwise end up in a landfill, you’re not only saving money but also contributing to a healthier planet.
Here are some key benefits of upcycling radiators:
- Cost-Effective: Transforming radiators into unique shelving or decorative pieces can save you a significant amount of money compared to buying new furniture. Plus, you’re using what you already have, which is always a smart move for your wallet!
- Unique Aesthetics: Upcycled radiator projects can give your home a distinctive flair. Each piece tells a story and adds character to your space. No two upcycled pieces are alike, making your home feel truly unique.
- Creative Outlet: Engaging in DIY projects allows you to express your creativity. Whether you’re a seasoned DIYer or just starting, turning a radiator into shelving can be a fun and fulfilling project.
- Preserving History: Older radiators often come with charm and character that new items simply can’t replicate. Upcycling allows you to preserve a piece of history and incorporate it into your modern decor.
Considerations Before You Begin
Before diving into the world of upcycled radiator projects, it’s essential to consider a few things:
- Safety: Ensure that your radiator is completely disconnected from any heating elements. This is crucial for safety to avoid any accidents during your DIY projects.
- Condition: Check the condition of your radiator. If it’s heavily rusted or damaged beyond repair, it may be best to look for another item to upcycle.
- Space: Think about where you plan to place your newly upcycled shelving. Measure the available space to ensure a perfect fit.
In conclusion, upcycling radiators is not just an eco-friendly choice; it’s an opportunity to unleash your creativity and make a statement in your home. Whether you’re looking for a conversation starter or a practical storage solution, repurposing radiators can satisfy both needs beautifully. So, gather those old radiators and get ready to turn them into something spectacular! Happy upcycling!
Creative Ideas for Transforming Radiators into Unique Shelving
Have you ever looked at an old radiator and thought, “What on earth can I do with that?” Well, you’re in for a treat! Upcycling radiators into unique shelving solutions is not just a sustainable choice—it’s also a great way to add a quirky touch to your home decor. Let’s dive into some creative ideas for giving those old heating units a second life!
1. The Classic Floating Shelf
One of the most popular ways to repurpose a radiator is by transforming it into a floating shelf. This design gives your space a modern feel while utilizing the radiator’s sturdy structure. Here’s how you can do it:
- Remove the Radiator: Carefully detach the radiator from its fittings. Make sure it’s completely drained and cooled down!
- Clean and Paint: A good scrub and a fresh coat of paint can breathe new life into your radiator. Consider using a color that complements your existing decor.
- Add Shelving Boards: Install wooden boards across the top of the radiator to create the actual shelving space. Use brackets or simply place them securely if the radiator structure allows for it.
2. Radiator Bookshelf
Do you have a collection of books that need a stylish home? Why not turn that old radiator into a fantastic bookshelf? Here’s how to get started:
- Choose Your Radiator Wisely: Opt for a taller radiator to give yourself ample space for your books.
- Install Wire Mesh: Adding a wire mesh or wooden slats will serve as the back of your bookshelf, preventing your favorite reads from falling through.
- Paint and Decorate: Personalize the look by painting it a bold color or adding decorative elements like stencils or wood accents.
3. Radiator Plant Shelf
Bringing a touch of nature indoors can brighten any space, and what better way to showcase your plants than with a radiator plant shelf? Here’s how to create your own:
- Prepare the Base: Use a horizontal radiator and lay wooden planks across the top for a sturdy base. Make sure they are well-secured!
- Add Planters: Incorporate pots of various sizes—think trailing plants for a cascading effect or larger pots for statement pieces.
- Consider Drainage: Since you’ll be using live plants, ensure that the pots have drainage holes to avoid water damage.
4. Artistic Display Rack
If you have a flair for the artistic, why not convert your radiator into a display rack for art pieces or collectibles? Here’s a fun way to do it:
- Sturdy Foundation: The radiator itself is a great base; just ensure it’s clean and stable.
- Install Shelves or Hooks: You can attach shelves at various heights or install hooks for hanging art pieces or decorative items.
- Showcase Your Style: Arrange your items in a way that reflects your personality, mixing and matching various textures and colors.
There you have it! With these creative ideas, you can transform your old radiator into a stunning piece of functional art for your home. Not only will you have a unique shelving solution, but you’ll also be contributing to a more sustainable world by repurposing what might otherwise be discarded. So, roll up your sleeves and get started on your upcycling adventure!
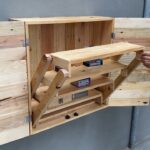
Step-by-Step Guide to DIY Upcycled Radiator Shelving Projects
Are you ready to embark on a fun and creative journey? Upcycling an old radiator into a unique shelving unit is not only eco-friendly but also a fantastic way to add character to your space. Let’s dive into a step-by-step guide to help you transform that forgotten piece of metal into a charming shelf!
Gather Your Materials
Before we get our hands dirty, let’s make sure we have everything we need. Here’s a quick list:
- Old radiator (make sure it’s clean and free of rust)
- Plywood or reclaimed wood for the shelves
- Wood screws
- Brackets (if needed for support)
- Paint or wood stain (optional)
- Sandpaper
- Measuring tape
- Drill
- Screwdriver
- Level
Step 1: Design Your Layout
First things first, envision how you want your shelving to look. Measure out the space where you plan to install the radiator shelving. Consider:
- How many shelves do you want?
- What will you display on them?
- The overall height and width of your unit
Sketch it out if you like! It’s always good to have a visual plan.
Step 2: Prepare the Radiator
Give your radiator a thorough cleaning. If it’s rusty, you might want to sand it down or use a rust-inhibiting primer before painting. A fresh coat of paint can breathe new life into it, so feel free to express your personal style with bold colors or timeless neutrals.
Step 3: Cut the Shelves
Using your measuring tape, determine the dimensions of the shelves you want. If you’re using plywood or reclaimed wood, mark your measurements and carefully cut the pieces. Sand the edges to ensure a smooth finish, which is especially important if you’re using reclaimed wood that might have splinters.
Step 4: Attach the Shelves
Now comes the exciting part! Position your shelves at your desired heights on the radiator. If you’re going for an open-shelf concept, you can simply rest the shelves on the radiator bars. For added stability, use brackets to secure them to the radiator.
Make sure everything is level—nothing’s worse than a crooked shelf! Use your level to ensure that each shelf is perfectly aligned before securing it.
Step 5: Finishing Touches
Take a step back and admire your work! Now, it’s time for the finishing touches. Consider adding decorative elements, like:
- Plants for a touch of greenery
- Books or trinkets to make it personal
- Art pieces to showcase your style
And there you have it—a stunning upcycled radiator shelving unit that’s not just functional but also a conversation starter!
Final Thoughts
Upcycling radiators into shelving units can be a rewarding project that helps you express your creativity while being kind to the planet. So roll up your sleeves, gather your materials, and get started on this delightful DIY adventure!
Related posts:
 laser daddy
 taliban hunter
 hunting picture
 rustic wood sign
 collage in hawaii
 Woodworking: Crafting Your Unique Product with Woodworking
 Unique Ways to Make Money with Crafts: Exploring Niche Markets
 Step-by-Step Guide to Using Laser Cutting for Vintage Repairs
 Renovating Classic Cars: Advanced CNC Fabrication Techniques
Personalized accessories to complement your outfit or project
Renovating Classic Cars: Advanced CNC Fabrication Techniques
Personalized accessories to complement your outfit or project
Comments