I. Introduction to Upcycling Feed Bags: Benefits and Ideas
II. Creative Projects: Transforming Feed Bags into Useful Items
III. Tips for Cleaning and Preparing Feed Bags for Upcycling
Introduction to Upcycling Feed Bags: Benefits and Ideas
Have you ever looked at an empty feed bag and thought, “What on earth can I do with this?” If so, you’re not alone! Upcycling feed bags is not only a creative way to repurpose materials, but it’s also a fantastic method to contribute to sustainability. Let’s delve into the world of upcycling feed bags, exploring the myriad of benefits and sparking some inspiration along the way!
Why Upcycle Feed Bags?
First off, let’s talk about the benefits of upcycling these often-overlooked bags. Here are some compelling reasons to consider:
- Environmental Impact: By upcycling, you’re reducing waste and lessening the demand for new materials. Feed bags are generally made from durable materials, which means they can be repurposed instead of ending up in a landfill.
- Creativity Unleashed: Upcycling encourages you to think outside the box. You can transform a simple bag into a unique item that reflects your personal style and creativity.
- Cost-Effective: Instead of spending money on new products, you can create something useful with materials you already have at home. This can save you money while also being a fun and satisfying project!
- Community Engagement: Upcycling can be a great way to connect with others who are passionate about sustainability. Hosting workshops or sharing your projects online can inspire others to join in on the fun!
Inspiring Ideas for Upcycling Feed Bags
Now that we’ve covered the benefits, let’s explore some exciting ideas for upcycling feed bags. The possibilities are endless, and with a little imagination, you can create functional and eye-catching items:
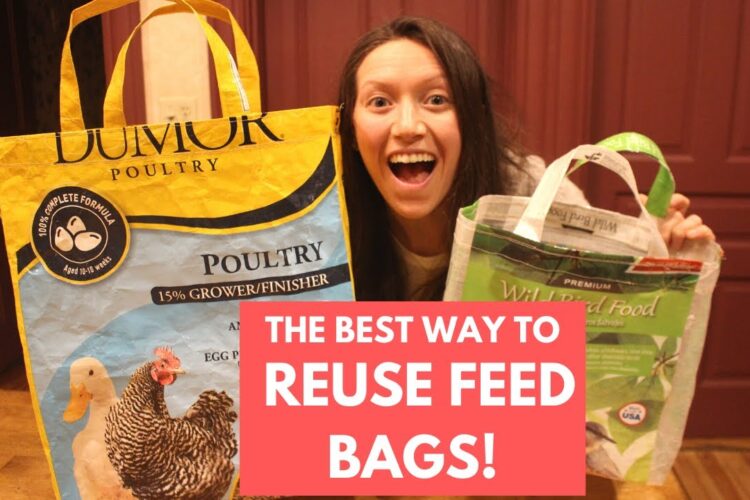
- Tote Bags: One of the most popular upcycling projects is transforming feed bags into stylish tote bags. They’re durable and perfect for grocery shopping or beach trips.
- Garden Planters: Cut the bags down and use them as planters in your garden. They’re great for growing herbs or flowers and add a pop of color to your outdoor space.
- Pet Accessories: Want to pamper your furry friend? Upcycle feed bags into pet mats, toys, or even stylish collars!
- Art and Decor: Create wall art or decorative items for your home. The bright colors and bold designs on feed bags can make for stunning visual pieces.
Get Started with Upcycling!
With so many exciting benefits and creative possibilities, why not take a moment to look at those empty feed bags lying around? Think of all the ways you can give them a new life and help the environment in the process. Upcycling feed bags is a fun, practical way to express your creativity while making a positive impact. Let your imagination run wild and start your upcycling journey today!
Creative Projects: Transforming Feed Bags into Useful Items
Welcome to the wonderful world of upcycling feed bags! If you’re ready to turn those colorful, sturdy bags into something new and functional, you’re in the right place. Feed bags are not only durable, but they also come in a variety of vibrant designs, making them perfect for all sorts of creative projects. Let’s dive into some fun ideas that can inspire your next DIY adventure!
1. Tote Bags Galore
One of the most popular ways to upcycle feed bags is by turning them into tote bags. They’re strong, spacious, and perfect for shopping trips or beach days! Here’s a simple way to get started:
- Cut the Bag: Start by cutting the top off the feed bag and trimming it to your desired height.
- Make Straps: Use the excess material to create straps or handles. Just cut strips of the bag and attach them securely to the sides of your new tote.
- Seal the Bottom: Fold the bottom inward and sew or use a strong adhesive to secure it. Voilà! You have a stylish, eco-friendly tote.
2. Garden Décor
Why not bring a touch of flair to your garden? Feed bags can be transformed into beautiful garden décor items. Here are a few ideas:
- Plant Holders: Cut the bags into various shapes and sizes to create unique planters. You can hang them up or place them on a table for an eye-catching display.
- Flower Beds: Use larger feed bags to create a temporary flower bed. Fill them with soil and plant your favorite flowers. They’ll look fantastic and can be easily moved around.
3. Pet Accessories
If you have furry friends at home, feed bags can be a goldmine for pet accessories:
- Dog Beds: Sew together multiple feed bags to create a cozy dog bed! Add some soft filling for comfort, and your pup will love you for it.
- Feeding Mat: Cut a feed bag into a rectangle or any shape you like, and use it as a feeding mat for your pets. It’s easy to clean and protects your floors!
4. Stylish Home Décor
Upcycling feed bags doesn’t stop at functional items; you can create some stylish pieces for your home as well:
- Pillows: Use the bags to sew your own decorative pillows. Just cut, sew, and stuff them with pillow filling. They’ll add a quirky touch to any room!
- Wall Art: If you’re feeling crafty, consider framing sections of the feed bags that feature interesting designs or logos. Hang them on your walls for a unique art piece.
5. Crafty Storage Solutions
Finally, let’s talk about organization! Feed bags can help you tidy up your space:
- Baskets: With a little weaving, you can create beautiful storage baskets. They’re perfect for holding toys, magazines, or anything that needs a home.
- Drawer Organizers: Cut and fold smaller pieces of feed bags to organize your drawers. They’re a fun way to keep things in order!
There you have it! With a little creativity and some hands-on effort, feed bags can be transformed into a myriad of useful and stylish items. So grab those bags, get crafting, and let your imagination run wild!
Tips for Cleaning and Preparing Feed Bags for Upcycling
So, you’ve decided to dive into the wonderful world of upcycling feed bags! That’s fantastic! But before you turn those bags into beautiful, functional pieces for your home or garden, it’s essential to give them a good clean and prepare them properly. Trust me, this step can make a world of difference in the quality of your finished projects. Let’s roll up our sleeves and get started!
1. Gather Your Supplies
Before you start cleaning, it’s helpful to have everything you might need on hand. Here’s a quick list of supplies you’ll want:
- Warm water
- Gentle detergent or soap
- A sponge or soft brush
- Spray bottle (optional)
- Patience and a sense of adventure!
2. Rinse Off Any Residue
Start by giving your feed bags a thorough rinse to remove any remaining feed or dirt. Take them outside if you can, as this can get a bit messy! Simply run some warm water over the bags, making sure to get into all the corners and creases. You can use a hose or a bucket of water—whatever works best for you.
3. Soap It Up
Once you’ve rinsed the bags, it’s time to clean them properly! Use gentle detergent with warm water to create a soapy solution. Dip your sponge or soft brush into the mixture and scrub away any stubborn stains.
For stubborn spots, you might want to use a spray bottle filled with the soapy solution and let it sit for a few minutes before scrubbing. This extra time can help loosen any grime, making it easier to wipe away.
4. Rinse and Dry
After you’ve scrubbed the bags, rinse them again thoroughly with clean water. It’s important to ensure no soap residue is left behind, as this can interfere with any paints or adhesives you may use later on.
Once rinsed, hang your bags out to dry. If you can, hang them in a sunny spot—sunlight can help eliminate any lingering odors and speed up the drying process.
5. Inspect and Prepare
Now that your bags are clean and dry, it’s time to inspect them for any tears or holes. If you find any, don’t panic! You can easily mend them with some fabric glue or sewing. This will ensure that your upcycled project is sturdy and ready for use.
6. Personalize Your Bags
This is where the fun really begins! Before you dive into your creative projects, think about how you want to personalize your bags. You can add stencils, paint, or even patches to make them uniquely yours. Just be sure that any materials you use are compatible with the bag’s surface to ensure they stick well.
And there you have it! Cleaning and preparing feed bags for upcycling doesn’t have to be daunting. With these simple steps, you’re well on your way to creating something wonderful. Happy upcycling!


Comments