I. Introduction to Upcycling Wooden Crates
II. Creative Upcycling Ideas for Wooden Crates
III. Tips for Painting and Finishing Your Upcycled Crate
Introduction to Upcycling Wooden Crates
Hey there! Have you ever stumbled upon a wooden crate at a flea market or perhaps in the back of a thrift store? If you have, you’re in for a treat! Upcycling wooden crates is not just a fun hobby; it’s a fantastic way to breathe new life into something that might otherwise end up in a landfill. Let’s dive into the world of upcycling wooden crates and explore why it’s so wonderful!
What is Upcycling?
Before we get into the juicy details about wooden crates, let’s clarify what upcycling really means. Upcycling is the process of taking old or discarded items and transforming them into something valuable, functional, or beautiful. Unlike recycling, which often breaks things down into raw materials, upcycling allows you to creatively reuse items while retaining their original form. And wooden crates? They’re the perfect candidates for some upcycling magic!
Why Choose Wooden Crates?
Wooden crates are incredibly versatile and come with a variety of benefits that make them a favorite among DIY enthusiasts:
- Durability: Made from solid wood, these crates are built to last. With a little love, they can withstand years of use.
- Character: Each crate has its unique charm and history. The natural wood grain and rustic finishes add a touch of warmth to any space.
- Affordability: You can often find wooden crates at low prices or even for free from local businesses or farms.
- Eco-Friendly: Upcycling crates not only saves them from the landfill but also reduces the demand for new materials, making it a sustainable choice.
Inspiration Awaits!
As you ponder what to do with those charming crates, remember that the possibilities are virtually endless! You can transform them into:
- Storage Solutions: Perfect for organizing toys, books, or even pantry items.
- Furniture: Think coffee tables, side tables, or even benches!
- Decorative Touches: Use them as planters, display shelves, or rustic wall art.
Getting Started
If you’re excited to dive into the world of upcycling, start by gathering a few crates. Look for different sizes and styles to mix and match for your projects. You don’t need a lot of fancy tools or skills to get going—just a bit of creativity and an open mind!
Remember, the journey of upcycling is all about having fun and expressing yourself. So, don’t worry if things don’t turn out perfect at first. Each project is a chance to learn and grow your skills!
In the upcoming sections, we’ll explore some creative ideas for turning those wooden crates into something extraordinary, along with tips for painting and finishing your upcycled treasures. So, stay tuned! The world of upcycled wooden crates awaits you!
Creative Upcycling Ideas for Wooden Crates
If you’ve ever stumbled across a wooden crate, you know they hold a certain charm that just begs to be transformed! Upcycling these rustic treasures can add a unique touch to your home decor while being both eco-friendly and budget-friendly. Ready to dive into some creative ideas? Let’s explore!
1. Stylish Plant Stands
Wooden crates can make fantastic plant stands or even vertical gardens. Here’s how you can do it:
- Layer it Up: Stack two or three crates and fill them with your favorite greenery. You can paint the crates or leave them natural for a more rustic feel.
- Wall-mounted Planters: Attach a crate to a wall and use it to display smaller plants or herbs. This not only saves space but also adds an artistic touch to your walls.
2. Unique Storage Solutions
Who doesn’t love a little extra storage? Wooden crates are perfect for organizing your space.
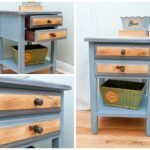
- Bedside Table: Turn a crate on its side to create a chic bedside table. You can store books or magazines inside while displaying decorative items on top.
- Kids’ Toy Storage: Create a fun toy box for your little ones. Let them personalize it with stickers or paint so it reflects their personality!
3. Rustic Coffee Table
Imagine a coffee table that’s not only stylish but also tells a story! Here’s a quick way to achieve this:
- Single Crate Table: Place a sturdy piece of glass on top of a single crate to create a simple yet elegant coffee table.
- Multi-Crate Design: Use several crates and arrange them in an interesting formation to create a larger coffee table. You can store magazines and remote controls within the crates.
4. Creative Wall Art
Wooden crates can also serve as the canvas for your artistic endeavors. Get ready to unleash your creativity!
- Shadow Boxes: Create a shadow box by adding a back and filling it with personal items or mementos. Hang it on the wall for a unique decorative piece.
- Gallery Wall: Paint several crates in different colors and hang them as part of a gallery wall. Use them to display smaller artworks or photographs.
5. Functional Pet Bed
Why should your furry friend miss out on the upcycling fun? Create a cozy pet bed with a wooden crate!
- DIY Pet Bed: Line the crate with soft cushions or blankets. It’s not only eco-friendly but also adds a stylish touch to your home.
- Elevated Design: Raise the crate off the ground with some sturdy legs or wheels for a modern look.
6. Customized Gift Baskets
Planning a special gift? Why not use a wooden crate as the gift basket itself?
- Personal Touch: Fill a crate with goodies like gourmet foods, homemade treats, or spa essentials. The recipient will love the thoughtful presentation!
- Seasonal Themes: Change it up for each season! Create a summer picnic basket or a cozy winter gift crate filled with hot chocolate and blankets.
Upcycling wooden crates opens up a world of possibilities, allowing you to express your creativity while being kind to the planet. So grab those crates and let your imagination run wild! Happy upcycling!
Tips for Painting and Finishing Your Upcycled Crate
So, you’ve found a wooden crate that you’re excited to upcycle, and now it’s time to make it truly your own! Painting and finishing your crate can not only enhance its aesthetic appeal but also protect it from wear and tear. Let’s dive into some friendly tips that will help you achieve beautiful results!
1. Preparing Your Crate
Before you unleash your creative spirit, proper preparation is key. Here’s how to get started:
- Clean the Surface: Dust off any dirt, grime, or old paint. A gentle wash with soap and water will do wonders. Just make sure it dries completely before you move on.
- Sand It Down: Use medium-grit sandpaper to smooth out any rough edges or splinters. This step is crucial for a better paint finish and for ensuring your paint adheres well.
- Remove Old Finish: If your crate has a previous stain or paint that you don’t want to show through, consider using a paint stripper or sanding it down more thoroughly. This will help you start with a clean slate.
2. Choosing the Right Paint
Now, let’s talk paint! The choice of paint can greatly affect the outcome, so consider the following:
- Type of Paint: For wooden crates, acrylic paints or chalk paints are fantastic options. They provide great coverage and are easy to work with.
- Finish Matters: Decide whether you want a matte, satin, or glossy finish. Matte gives a rustic look, while glossy adds a modern touch. Choose what aligns with your style!
- Eco-Friendly Options: If you’re environmentally conscious, look for low-VOC or natural paints that are less harmful to the environment.
3. Application Techniques
Time to get painting! Here are a few application techniques to ensure you get that professional look:
- Use a Primer: Applying a coat of primer can help your paint adhere better and enhance the colors you choose.
- Brush vs. Spray: Paint brushes are great for precision and detail, while spray paint can provide a smooth, even coat. Try both methods on a scrap piece if you’re unsure!
- Multiple Coats: Don’t be shy about layering! Two or three light coats are better than one thick coat, allowing for even drying and better durability.
4. Finishing Touches
Once the paint is dry, you’ll want to protect your hard work:
- Seal It: A clear sealant can protect your painted crate from scratches and moisture. Polyurethane or a water-based sealant are excellent choices.
- Consider Distressing: If you’re going for a rustic look, lightly sand edges or use a distressing technique to give your crate character.
- Accessorize: Adding handles, stencils, or decorative embellishments can personalize your crate even further. Let your creativity shine!
There you have it—your complete guide to painting and finishing your upcycled wooden crate! Remember, the key is to have fun and let your personality shine through. Happy upcycling!
Related posts:
 Creative Commerce: Building a Business with Your Craft
CNC: Uncover Your Unique Product with CNC Machining
3D Printing: Profitable Ventures with 3D Printing
best personalization gifts
Creative Commerce: Building a Business with Your Craft
CNC: Uncover Your Unique Product with CNC Machining
3D Printing: Profitable Ventures with 3D Printing
best personalization gifts
 jersey personalization near me
how to upcycle a small white satellite dish
how to upcycle pill bottles
top upcycling
upcycled steampunk
jersey personalization near me
how to upcycle a small white satellite dish
how to upcycle pill bottles
top upcycling
upcycled steampunk
 how to price upcycled furniture
Comments