I. Understanding the Benefits of Upcycling a Pine Bed
II. Creative Upcycling Ideas for Your Pine Bed
III. Step-by-Step Guide to Upcycling Your Pine Bed
Understanding the Benefits of Upcycling a Pine Bed
If you have an old pine bed sitting in your home, you might be wondering what to do with it. Rather than tossing it aside or sending it off to a landfill, consider the wonderful world of upcycling! Upcycling is all about transforming something old into something new and fabulous, and your pine bed is the perfect candidate for this creative endeavor. Let’s dive into some of the benefits of upcycling that beloved piece of furniture.
1. Environmental Impact
One of the most significant benefits of upcycling is its positive impact on the environment. By upcycling your pine bed, you’re not only reducing waste but also minimizing the demand for new materials. Here’s why this matters:
- Diminished Landfill Waste: Every piece of furniture you upcycle keeps it out of landfills, where it would take years to decompose.
- Less Resource Depletion: Creating new furniture requires trees, water, and energy. Upcycling helps preserve these resources.
- Lower Carbon Footprint: Upcycling reduces the need for manufacturing, which can be energy-intensive and polluting.
2. Cost-Effectiveness
Let’s face it—furniture can be pricey these days! Upcycling your pine bed is not only a sustainable choice but also a wallet-friendly one. Here are a few reasons why:
- Save Money: Instead of splurging on a new bed or furniture, why not invest a little elbow grease to transform what you already have?
- Customize to Your Taste: Upcycling allows you to create personalized pieces that reflect your style, without the hefty price tag.
3. Creative Expression
Upcycling is not just a practical choice; it’s also an opportunity for creative expression! Personalizing furniture can be incredibly fulfilling. Here’s how upcycling encourages your inner artist:
- Unique Designs: Every upcycled piece tells a story. You can incorporate colors, patterns, and styles that resonate with you.
- Skill Development: Whether you’re painting, sanding, or reupholstering, upcycling helps you develop handy DIY skills.
- Show Off Your Work: Your friends and family will be amazed at the transformation, and you’ll have the satisfaction of showing off your unique creation!
4. Quality and Durability
Let’s not forget that pine is a durable and sturdy material. When you upcycle your pine bed, you’re often working with a piece that has stood the test of time. Here are some advantages:
- Built to Last: Older furniture tends to be made with higher-quality materials than many modern options, which can be flimsy.
- Restoration Potential: With a little TLC, your pine bed can regain its original glory and continue to serve you well for years to come.
In conclusion, upcycling your pine bed is a fantastic way to benefit the environment, save money, express your creativity, and work with durable materials. So, gather your tools and get ready to embark on a rewarding DIY journey!
Creative Upcycling Ideas for Your Pine Bed
So, you’ve got an old pine bed frame sitting in the corner of your room, and you’re wondering what to do with it. Instead of tossing it out or letting it gather dust, why not breathe new life into it through upcycling? Upcycling is not just eco-friendly; it’s a fabulous way to express your creativity and make something unique for your home. Let’s dive into some fun and innovative ideas for transforming that pine bed!
1. Turn It Into a Bench
One of the simplest and most functional ways to upcycle your pine bed is to convert it into a cozy bench. Here’s how you can do it:
- Disassemble the Bed: Start by taking apart the bed frame. Keep the headboard and footboard, as these will form the ends of your bench.
- Add a Seat: Use a thick piece of plywood or reclaimed wood as the seat. Sand it down for a smooth finish, and you can even paint or stain it to match your decor.
- Paint and Customize: Get creative! Add a splash of color or some stenciled designs to make it your own.
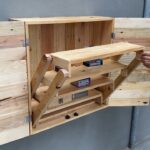
2. Craft a Bookshelf
If you’re an avid reader or simply love to showcase your favorite knick-knacks, turning your pine bed into a bookshelf can be a stylish solution.
- Use the Side Rails: Cut the side rails to the desired height and secure them vertically to create the sides of the bookshelf.
- Install Shelves: Use wooden planks or even repurposed crates to create shelves between the side rails.
- Finish It Up: Sand, paint, or stain the bookshelf to fit seamlessly into your space.
3. Create a Garden Planter
For those with a green thumb, why not transform your bed frame into a planter? It’s a great way to bring some greenery into your home or garden.
- Remove the Mattress Support: Take out the slats or support beams, leaving just the frame.
- Add a Liner: Line the inside with landscaping fabric to hold soil and moisture.
- Fill with Soil: Add soil and plant your favorite flowers, herbs, or vegetables for a rustic planter that adds charm to any space.
4. Make a Pet Bed
Don’t forget about your furry friends! An upcycled pine bed can easily become a comfy pet bed.
- Modify the Frame: Adjust the height if necessary, and clean the frame thoroughly.
- Add Cushioning: Purchase or make a soft cushion that fits snugly inside the frame. You can even sew a custom cover.
- Personalize It: Add your pet’s name or some fun designs to the frame for a personal touch.
Upcycling your pine bed isn’t just about recycling; it’s about creating something beautiful and functional that reflects your style. Whether you go for a bench, bookshelf, garden planter, or pet bed, the possibilities are endless. So grab those tools, let your creativity flow, and start your upcycling adventure today!
Step-by-Step Guide to Upcycling Your Pine Bed
Ready to breathe new life into your old pine bed? Upcycling is not just a sustainable choice; it’s a fun project that can add a personal touch to your home. Let’s dive into a straightforward step-by-step guide that will turn your tired old bed into a stunning centerpiece!
Step 1: Gather Your Supplies
Before you get started, it’s important to gather all the necessary tools and supplies. Here’s a handy checklist to help you:
- Sandpaper (various grits)
- Paint or wood stain (eco-friendly options are available!)
- Paintbrushes or rollers
- Sealant (if you’re staining)
- Drop cloths or newspapers
- Safety goggles and a mask (safety first!)
- Optional: Decorative hardware or stencils
Step 2: Prepare Your Workspace
Find a well-ventilated area to work in, preferably outdoors or in a garage. Lay down drop cloths to protect the floors or ground. Set up your bed frame, and get ready to transform it!
Step 3: Disassemble Your Bed
Carefully take apart your pine bed. This usually involves removing the mattress, headboard, footboard, and side rails. Keep the screws and hardware in a labeled bag so you don’t lose anything. Trust me, you’ll thank yourself later!
Step 4: Sanding the Surface
Sanding is a crucial step that prepares the wood for painting or staining. Start with a coarser grit sandpaper to remove any old finish and then switch to a finer grit to smooth the surface. Remember to wear your safety goggles and mask to avoid inhaling dust!
Step 5: Cleaning and Prepping
Once you’ve finished sanding, wipe down all surfaces with a damp cloth to remove dust. Allow the wood to dry completely. This step ensures that your paint or stain adheres properly, giving you that perfect finish.
Step 6: Painting or Staining
Now comes the fun part! Choose whether you want to paint or stain your bed. If painting:
- Apply a primer coat if you’re using a lighter color.
- Once dry, paint your chosen color in even strokes.
- Let it dry and apply a second coat for full coverage.
If staining:
- Apply the stain with a clean cloth or brush, following the wood grain.
- Wipe off excess stain after a few minutes, and let it dry.
- Seal it with a protective coat for durability.
Step 7: Reassemble Your Bed
After everything is dry and looking fabulous, it’s time to put your bed back together. Use the labeled bag of hardware to reattach the headboard, footboard, and side rails. Make sure everything is secure!
Step 8: Add Your Personal Touch
Now that your bed is complete, why not add a few personal touches? Consider adding decorative hardware, or using stencils to paint designs on the headboard. Get creative and make it yours!
Step 9: Enjoy Your New Bed!
Step back and admire your handiwork! You’ve not only upcycled your pine bed but also created a unique piece that reflects your style. Now, go ahead, add your favorite bedding, and enjoy a restful night’s sleep!


Comments