I. Understanding the Basics of Upcycling a Pet Gate
II. Creative Ideas for Repurposing Your Pet Gate
III. Step-by-Step Guide to Upcycling Your Pet Gate
Understanding the Basics of Upcycling a Pet Gate
Have you ever thought about giving your old pet gate a new lease on life? Upcycling is not just a trend; it’s a fabulous way to reduce waste while getting creative! Whether your pet gate has seen better days or you simply want to transform it into something fresh and useful, understanding the basics of upcycling is your first step.
What is Upcycling?
In simple terms, upcycling is the process of taking something that is no longer needed and transforming it into something new and of higher value. It’s a fantastic way to be environmentally friendly while letting your creativity shine! Think of it as second-chance crafting. And let’s face it, who doesn’t love a good DIY project?
Why Upcycle Your Pet Gate?
Before diving into the nitty-gritty, let’s explore why upcycling your pet gate is a splendid idea:
- Environmental Impact: Upcycling reduces the amount of waste that goes to landfills, helping the planet by minimizing your carbon footprint.
- Cost-Effective: Instead of purchasing new items, you can create something unique without breaking the bank!
- Personal Touch: Upcycling allows you to customize your project to fit your style and needs, making it truly one-of-a-kind.
- Fun and Rewarding: There’s something deeply satisfying about creating something new from something old. Plus, it’s a great way to spend a weekend!
Assessing Your Pet Gate
Before you start dreaming up your next big project, take a moment to assess your pet gate. Consider the following:
- Condition: Is it sturdy and functional? Or is it a bit rickety? Knowing its condition will help you determine what projects are feasible.
- Material: What’s it made of? Wood, metal, or plastic? Each material has its unique advantages and potential uses.
- Size: How large is your gate? This can influence the scale of your upcycling project and the types of creations you can make.
Gathering Your Supplies
Now that you’ve assessed your gate, it’s time to gather some supplies! Here are a few essentials you might need:
- Tools (screwdriver, saw, hammer, etc.)
- Sandpaper or paint for refinishing
- Decorative elements (paint, fabric, decals)
- Safety gear (gloves, goggles)
Remember, upcycling is all about creativity. Don’t be afraid to think outside the box and explore different ideas!
Conclusion
Upcycling your pet gate can be an exciting and fulfilling project that not only keeps it out of the landfill but also allows you to express your creativity. With a little bit of planning and imagination, your old pet gate can become a stunning new addition to your home. So, roll up your sleeves and get ready to transform that gate—you’re about to embark on a delightful DIY journey!
Creative Ideas for Repurposing Your Pet Gate
Hey there, fellow pet lover! If you find yourself with an old pet gate that’s seen better days, don’t toss it out just yet. Upcycling is not only a sustainable practice, but it can also spark creativity and add a fresh touch to your home. Let’s explore some fun and inventive ways to give that pet gate a new lease on life!
1. DIY Garden Trellis
Have a green thumb? Transform your pet gate into a charming garden trellis! Just sand it down, give it a fresh coat of paint, and use it to support climbing plants like beans or flowering vines. It adds a rustic touch to your garden and helps your plants thrive!
2. Creative Wall Art
Why not turn your old gate into a stunning piece of wall art? You can paint it in bold colors or keep it natural for a more rustic feel. Hang it up in your living room or even on a porch for a unique statement piece. You can also attach photo frames or string lights to make it even more inviting!
3. Room Divider
If you’re looking to create a little privacy in a shared space, your pet gate can easily be reimagined as a stylish room divider. Secure it in place and drape some fabric or lightweight curtains over it. This way, you can segment off an area for a cozy reading nook or a workspace without the need for a permanent wall.
4. A Unique Bookshelf
Love to read? Turn that pet gate into a quirky bookshelf! Simply lay it down horizontally, and stack some wooden crates or sturdy boxes on each side. You’ll have a stylish way to display your favorite books and add character to your space.
5. Pet Bed Stand
If you’re a pet parent (which we know you are!), consider transforming your old gate into a custom pet bed stand. By laying it flat or propping it up, you can create a cozy nook for your furry friend. Add a soft cushion, and voila! Your pet has a chic new spot to snooze in style.
6. Decorative Fencing
Make your outdoor space pop by using the pet gate as a decorative fence around your garden or flower bed. It adds a touch of charm while keeping pets and children out of your plants. You can paint it in vibrant colors or leave it as is for that vintage look!
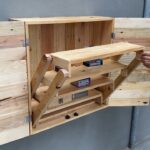
7. Craft Supply Organizer
Are you a crafty person? Use the gate to organize your craft supplies! Hang it on the wall and attach baskets or hooks to hold everything from yarn and fabric to tools and ribbons. It’s an excellent way to keep your supplies visible and easily accessible while adding a creative flair to your workspace.
As you can see, the possibilities are endless when it comes to upcycling your pet gate. Each of these ideas not only breathes new life into your old gate but also allows you to express your personality and style. So roll up your sleeves, grab some paint or tools, and start crafting your next masterpiece!
Step-by-Step Guide to Upcycling Your Pet Gate
Ready to give your old pet gate a new life? Upcycling is not only eco-friendly but also a fun way to express your creativity! Here’s a simple and friendly guide to help you transform that unused pet gate into something fabulous.
Step 1: Gather Your Supplies
Before diving in, let’s gather everything you’ll need:
- Old pet gate
- Sandpaper (medium and fine grit)
- Paint or wood stain (if you want to change the color)
- Paintbrush or roller
- Protective gloves
- Decorative elements (like stencils, fabric, or hardware)
- Drill or screwdriver (if you’re adding new features)
Step 2: Clean the Pet Gate
Start with a good cleaning! Use a damp cloth to wipe down the gate, removing any dust or pet hair. If it’s especially grimy, a mild soap solution will do the trick. Make sure it’s completely dry before moving on to the next step.
Step 3: Sand the Surface
Time to get a little crafty! Using medium-grit sandpaper, gently sand the surfaces of the gate. This will help the paint or stain adhere better. Once you’ve roughed up the surface a bit, switch to fine-grit sandpaper for a smooth finish. Remember, safety first—wear gloves to protect your hands!
Step 4: Paint or Stain Your Gate
Now for the fun part! Choose a color that suits your style or complements your home decor. Whether you opt for a bold shade or a subtle stain, apply the paint or stain evenly with your brush or roller. Don’t forget to paint in the direction of the wood grain if you’re using stain! Let it dry completely, and feel free to add a second coat for a richer color.
Step 5: Get Creative with Decorative Elements
This is where your personality shines! Consider:
- Adding stencils to create patterns or designs
- Attaching fabric or mesh to make a decorative notice board
- Using hooks or knobs to turn it into a storage solution for leashes or other pet accessories
Let your imagination run wild! Just be sure to secure any new elements tightly, especially if they’ll be holding something.
Step 6: Assemble and Install Your Upcycled Gate
If you’ve made modifications (like changing it from a gate to a shelf, for example), now it’s time to put it all together. Find the perfect spot in your home for the upcycled gate. Whether it’s a quirky shelf in the living room or a fun pet accessory organizer near the front door, make sure it’s both functional and visually appealing!
Step 7: Enjoy Your New Creation!
Congratulations! You’ve successfully upcycled your pet gate. Now, sit back and admire your handiwork. You’ve not only saved an item from the landfill, but you’ve also added a unique piece to your home. Share your creation with friends and family, and don’t forget to showcase it on social media—after all, you deserve to show off your crafty skills!
Happy upcycling!


Comments